Smudging Ceremony

We have some dear friends who have a Native American heritage. They recently had their baby boy blessed and they told us they were going to be giving him an “Indian name” and a blessing. I thought that was so cool! I asked if there was a way that Amelia could get a name and they said that we all could! I was so excited! What a fun tradition. Our friend’s father is or was an actual Indian Chief for several years. It’s a tradition that he has done for his family and it will be passed down to future generations as well.

What does it mean to be given a name?

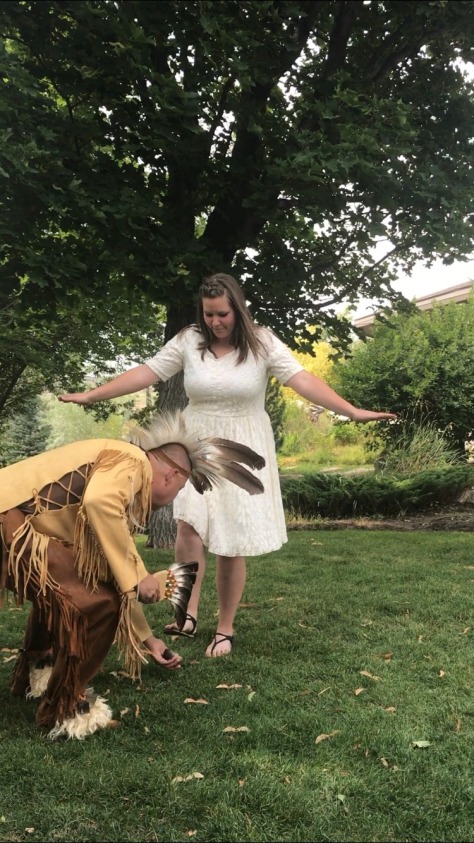
The “smudging” ceremony is custom of Native American culture. It is a way to create a cleansing smoke bath that is used to purify the body, aura, energy, ceremonial/ritual space or any other space and personal articles. For us, we were surrounded by the burning sage and then given a name and a blessing of sorts. I was excited to find out the names, of course, but it was a lot more emotional than I was expecting. I might have shed some tears when it was Amelia’s turn. The chief had us spread out our arms and then he went around our arms, feet and back with the sage and a large feather. Our friend actually chose our names because he knew us and he had prayed about what names we should have.


Our names defined (as they were given)

Jason received his name first and was given: Wise Owl.

The reason our friend chose Wise Owl is because Jason is the one who watches over our family. He is the one who is going to see things before they happen. The way he goes about his decisions and life he makes sure to plan it out. He doesn’t jump to conclusions like a cat – Jason thinks things out without acting on them impulsively. He is patient. He really thinks before acting. Through the thinking process, and with his family, it is done the way Jason sees it. All things are done with patience.

I was next and received the name: Mother of Rivers.

“Rivers are steady and go one direction. They don’t change – they may branch off, but they don’t change. They are solid in what they do. You are a mother and each of your children that you have are going to branch off one day. They will go in the direction that you point them for their whole lives. It is really important that you teach them the right way. I was inspired to give you this name because rivers are really strong – they can take trees with them or anything down to get where they need to go. They will do what needs to be done.”

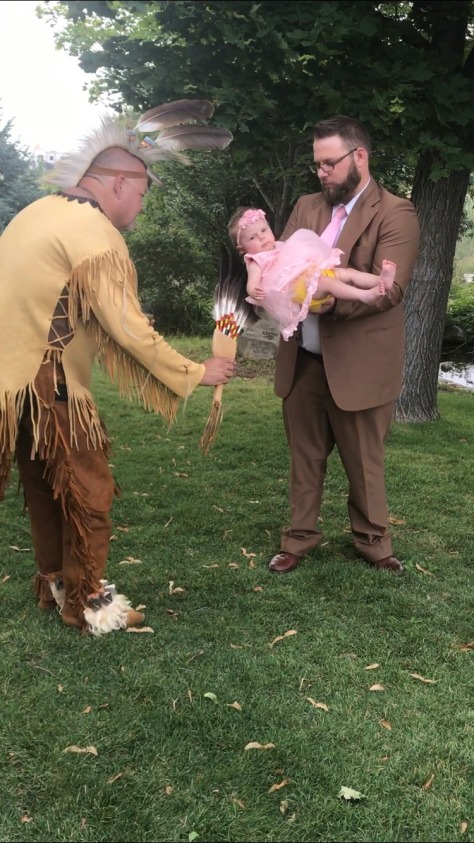
Amelia received the name: Little Sky.

“I knew her name was Little Sky because she’s literally a piece of Heaven for you. She’s going to be there when the clouds come and she”ll be there when they leave. The sky is what holds up the sun and the moon. It’s what holds everything together. That is what she will be for you.”

I’m so grateful and feel so blessed to have been given this unique opportunity. What a great tradition that that family let us become a part of. It’s a memory that we will cherish.

IMG_7621

IMG_7622

IMG_7627

DIY Natural Laundry Detergent

When converting our household to organic / chemical-free items, one of the first things I looked into was detergent. Mainly because both my husband and baby have sensitive skin. I have been using All Free & Clear up until recently for a couple reasons. It is Free and clear of harsh chemicals (baby approved) and it’s fairly inexpensive.

I had been trying to find a DIY detergent, but it can be overwhelming because there are so many different recipes. Sometimes the recipes have expensive ingredients or there are some that just aren’t that great. I found this recipe inspired originally by Christi at halfwaytoheavenhomestead. Check her out at https://www.instagram.com/halfwaytoheavenhomestead/ 

All of these items can be found at Walmart! The only one I had to order was the liquid Castile Soap.

This is my first week trying this detergent! I know it will be soft enough for baby’s skin, but will it be strong enough to clean cloth diapers?? I’ll let you know next week how it works!

Materials Needed:

Super Washing Soda

Baking Soda

Pure Castile Liquid Soap

Essential Oil

Ladle (for stirring and scooping)

2 Gallon Jar

Directions:

Start by pouring 1 cup of Washing Soda into your 2 gallon jar.

IMG_7593

Put just enough water in the jar to cover the washing soda.

Then add 1 cup Baking Soda.

IMG_7594IMG_7595

Completely fill the jar with water and stir. When I stirred, some of the washing soda stuck to the bottom. Using a wooden spoon to stir helped.

Add in 1 1/2 cups Pure Castile Soap.

IMG_7596

Add in 40 drops of your favorite essential oil. I used lavender because I love the smell and it’s safe for babies.

IMG_7597

Stir everything together and it’s done!

Order these cute canister labels from Kendra’s Corner Market

I use 1/2 cup per regular size load.

Also note that it is normal for the liquid to separate. Just simply stir before scooping out your detergent.

Happy crafting friends!

DIY Chicken Nesting Boxes for $15

I am so excited that we finally got our chickens and ducks! Is it officially a little farm now?? Jason wanted a cowboy hat because he’s cute and thinks he’s a farm boy now so we both got new ones. It was fun! 

Anyways, because of building the fences and coop by ourselves we were a little exhausted from DIY projects. We looked for some nesting boxes at our local ranch store and found out that one, individual box was $14.99. HOLY CRAP! So back to DIY we went. Like, it wasn’t even made that well. It was plywood. And whenever I see something overpriced I always find a way to make it myself. So I’m doing this tutorial in hopes that someone else who doesn’t want to spend $15 a nesting box can make these as well. We ended up making 12 nesting boxes for $15.

First off, we headed to Lowe’s to get the plywood. I forgot to take a pic of the one we got, but it was almost $15 and maybe 1/8 inch thick. 4 x 8 feet. And that’s it! We already had the staples but if you need them we got the 3/8 inch Crown staples for our Compressed Staple Gun. 

MATERIALS YOU WILL NEED:

4 x 8 foot Plywood sheet

Staples and staple gun

Table saw/ Miter saw

At Lowe’s, we had a guy cut the plywood for us into 12 inch x 4 foot sections. That just made it easier on us. Then we sat down and thought about how many pieces we would need to cut. We would need several 12 x 2 inch pieces for the front and back. And also the dividing pieces. My hubby did the math on these, but it wouldn’t be too hard to figure out. I like to draw it out in my head. Since we need 12 nesting boxes, that’s 36 small pieces and 10 dividing pieces.

We left 3 of the 12 inch x 4 feet sections to use as the base.

Start by cutting a few of your sheets into 12 x 12 ‘s. These are eventually going to be your dividing pieces. Then cut your 12 x 2 ‘s.

You should have a pile that looks like this.

Then take those 12 x 12 ‘s and set your saw to a 45 degree angle. Then we measured 2 inches up from the base and cut there.

Yay! The cutting is over! We measured and marked the base pieces every 12 inches apart. Then chalked to make the stapling more accurate. Line up the dividing pieces to the base pieces every 12 inches and staple down the back

.

Do this to all the dividers and bases. Then you attach the 12 x 2 ‘s to the front and back. We did a top 12 x 2 every once in a while just for extra support.

That’s it! We didn’t put end pieces on this one because it was going right up to the sides of the coop. Next is the fun part – installing it to the coop!

the bottom of these are not very strong so you will need to rest them on something. We used 2 x 10 ‘s that we had on hand. We made little tables so they had legs on the ground. Then we attached them to the wall they were next to. After that, we laid the nesting boxes on and used the nail gun to attach to the bottom support and the back wall. And look how pretty they turned out!

Just make sure it is sturdy and low enough the chickens can get on. We thought about building a walk-way, but decided against it. The chickens can jump enough to get on. These are 19 inches off the ground. Add your bedding and you’re good to go!

I hope this tutorial helps someone out! It’s an easy build that is cost effective as well. I will be doing a full coop tour once it’s all painted and pretty! Thanks for reading friends!